« Back in England | Main | East Sussex Walks Online »
September 10, 2007
How to Geo-Tag Photos
This page describes my experiences whilst geo-tagging my photos, and how I used these photos online.
Some background: Digital photos saved in the .jpg or .tif format, as most of them are, have information included with the photos that many people are not aware of. The information is kept in two 'tags' that are embedded in the photo-file itself - the EXIF tag, and the IPTC tag. They can be easily viewed with the right software - more about that later.
Some of the information in the tags is saved automatically by many cameras, and may include details of the type of camera used, the shutter speed, aperture setting, ISO rating, time and date that the photo was taken, etc. Other information can be added manually - this might be such data as the photographer's name, a title or a caption. In the list of EXIF tags there is also a section for GPS position - in other words, the location of the camera when the photo was taken. This opens up all kinds of exciting possiblities, allowing a photo to be allied to an online map or earth-viewer, or to have its position entered to a database which could then be searched according to geographical coordinates, locating, for instance, a photograph nearest to a certain point or place.
View Larger Map in a new Browser
Here's a map of one of my walks. Each marker hides a photo - click on one to see! You can drag the map around, or zoom in and out. All of this is done with geo-code photos !
Why Geo-Tag Photos?
Geo-tagged photos can be used for a number of purposes. These might be:
1/ To show a view of a certain position or location.
2/ To record the position of a particular object or view.
3/ To show the location of views that can be seen whilst proceding from point to point.
4/ To capture the position of a unique event that doesn't normally occur there.
You might combine 1 or more of the above as reasons for geo-tagging your photos. For instance, I take photos on my walks to show people what the countryside around here is like, but I also like taking photos, and keep trying to take better ones. Most, though not all, of my photos try to be photos that stand alone by themselves. If I was just documenting my walks, I would take photos every 100 metres or so, regardless of what the photos came out like. I might also take photos that always looked in the direction I was walking, not to the sides, or behind me.
My photos, once geo-tagged, can be referenced to any mapping system. I can upload those photos to services such as Panoramio or Flickr. My photos carry their position permanently embedded in their EXIF tags. People could even use this data to find where I was at a particular time, or to see the view that I saw for themselves. The possibilities of geo-tagged photos are only just being discovered, but its a sure thing that they will be vital in the future. Protect yourself against image-obsolescence by Geo-Tagging right now!
How to Geo-Tag Photos
To save the location in the embedded EXIF tag of the photo, you can either do it when the photo is taken, or later on, when you are back at your computer.
To do this when a photo is taken, you will need a camera that has these capabilities. Not many do so. One popular model is the Nikon D200, which can be connected either directly to a GPS receiver using home made or purchased cables, or via a BlueTooth link using the RedHen unit and a GPS receiver equipped with BlueTooth. Other cameras include the Canon EOS 1D Mark III, the Fuji S5, Kodak's DC265 and DC290, and the Ricoh 500SE.
Choosing to geo-tag photos once you are back at your computer allows you to use practically any digital camera. You can even geo-tag scanned negatives or tranparencies! First, you will need some software that can accomplish this. Whilst a knowledgeable person could geo-tag with a simple text-editor, it is much more sensible to chose a program designed for the task. Various programs are available: these can be divided into the following categories:
a/ Command Line - Manual Entry
This category assumes that you have a list of coordinates ready to enter in the EXIF tag of each photos. An excellent and well-regarded tool that can do this is ExifTool by Phil Harvey. This program is platform-independent, and performs all manner of tasks to do with reading and writing photo tag-data. It also does it with out degrading the original image - an important point to note when considering a choice of software. The last thing you want is to do a batch-process on your original files and find that they have all been degraded whilst having their tags changed!
The problem with Command-Line entry is that it is not very user-friendly - many people these days prefer a program that will hold your hand a little and monitor what you are doing through a familiar window.
b/ Simple GUI (Graphics User Interface) - Manual Entry
For those who prefer a GUI, there are 2 progams that provide a shell for ExifTool, allowing you to use the same program as above without needing to know or type in a long list of complex commands.
The down-side, though, is that neither program provides the full functionality of ExifTool. Perhaps one day someone will write one, but in the meantime we have these:
1/ExifTool GUI for Windows
2/ExifAuto
c/ Complex GUI - Automatic Entry
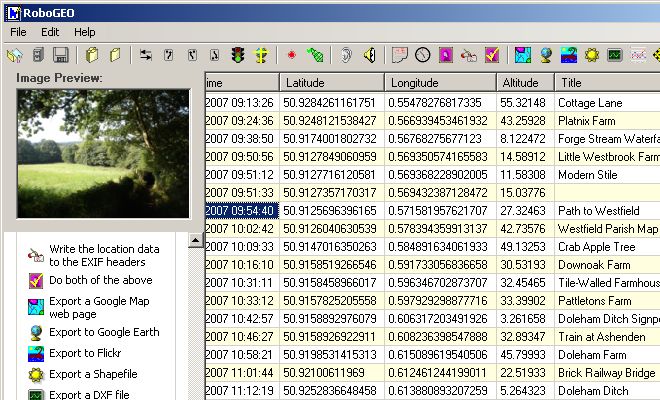
The programs above assume you wish to enter the location for each photo from a list. But there are other, more automatic ways of geo-tagging. The first makes use of the popular Google Earth service to identify visually just where the photo was taken, and then grab the coordinates that you need. One program that can do this is Google's Picasa. Here are some tips to help. Alternatively, you can use RoboGeo, which has many facilities in addition to its Google Earth capabilities.
 One of these takes automation even further, by tagging a whole folder of photos without the need for you to enter a single latitude or longitude! The way it does it is rather clever. When you set out for your morning photo-shoot, you turn on your GPS receiver, and tell it to create a Track. You then turn on your camera, and check that its internal clock is set to the same tme as the GPS. Having done that, you can put the GPS in your bag or clip it to your belt, and forget about it for the rest of the day. Whenever you snap a photo, your camera will record on the EXIF tag of that image the exact time, to the second, when the photo was taken. When you get back to your computer, you download the Track-file from your GPS. RoboGeo will then check the time that each photo was taken, and unless you are flying a jet-fighter plane, will work out from the Track-file exactly where you were, and write the EXIF location-tags accordingly. Pretty neat, huh ?!
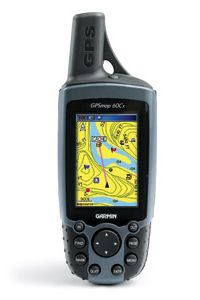
You can use a dedicated GPS receiver made for this job, such as the Sony GPS-CS1KA GPS Location Recorder, which is small enough to hang on your belt-hook un-noticed, or you can use the GPS receiver you already have - for me this is the Garmin GPSmap60cx, which I found at the Global Gizmossite for a very good price.
RoboGeo is not the only software that can geo-tag photos in this way, though I do like its functionality, and its additional capabilities that let it output a Google Map complete with thumbnails (see one of mine here) or a Google Earth .kml file, or even ESRI shapefiles that can be used in more complex display and GIS appplications.
Also worth trying is GPicSync. It is a free download that works with any standard GPS receiver, and has an active user group.
Another program is PhotoMapper, a free GPL licensed GPS Photo-Tagging software application.
Important Points
The above 'automatic' programs rely on a log of your track, stored by a GPS receiver. This track will be composed of a number of tracklog points that record your position as you moved about during the day. In order that you can cross-reference your photos, it is VITALLY IMPORTANT that each point also has a time associated with it. You should be aware that when you Save a track in your Garmin receiver, not only is the time for each point deleted, but also 5 out of every 6 trackpoints are discarded!!! You should also be aware that GPX files, which are a collection of points from a track, DO NOT have the time for each point included, so for the purposes of geo-tagging photos, a .gpx file is USELESS !!! What can be done about this? Well, the only log in your GPS that retains the time for each position is the one called the Active Tracklog. This is the one that you need to use. RoboGeo uses this file when geo-tagging photos, though be aware that the Active Tracklog contains all the tracks you have made recently, and when presented with it, RoboGeo will include all the trackpoints with your map, which is a bit crazy if you only want to use one track. You could of course delete the old Active Tracklog before you start the day's photoshoot, in which case only your new track will be included in the Active Tracklog. Alternatively you can use a program that will let you choose which bit of the Tracklog to include. A useful program that does this is the free DNRGarmin GPS application from the Department of Natural Resources at Minnesota State University. You can easily select the section of the Active Tracklog that you need, and save it as a text-file that RoboGeo will utilise. Lets hope that one day Tim Helton will add this same functionality to RoboGeo itself, plus the ability to see the track on a map, and maybe alter it, before it is used in the tagging process.
Footnotes
You might like to look at the following WikiPedia pages for further ideas:
GeoTagging
Geocoded Photographs
Posted by travellingtim at September 10, 2007 05:53 PM